19-5A: FLASHING DETAILS FOR
CONCRETE MASONRY WALLS
Keywords:
cavity walls, construction details, flashing, moisture, single wythe walls, vents, weep holes
INTRODUCTION
At critical locations throughout a building, moisture which manages to penetrate a wall is collected and diverted to the outside by means of flashing. The type and installation of details may vary depending upon exposure conditions, opening types and locations and wall types. This TEK is a collection of typical flashing details that have proven effective over the long term and a wide geographical range. The reader is also encouraged to review the companion TEK 19-4A Flashing Strategies for Concrete Masonry Walls (ref. 3) which addresses the effect of moisture on masonry, design considerations, flashing materials, construction practices, and maintenance of flashing.
CAVITY WALLS
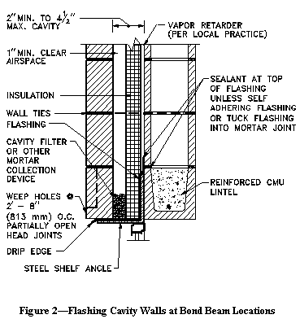
For cavity walls, as illustrated in Figure 1, the cavity ranges from a minimum of 2 in. to a maximum of 4 � in. wide with a minimum of a 1" clear airspace for a drainage way if insulation board is placed in the cavity. Cavities wider than 4 � in. are permitted only if a detailed analysis is performed on the wall ties per the Building Code Requirements of Masonry Structures (ref. 1) The 1 in. clear airspace works only if the mason takes precautions to insure that mortar will not be bridging the airspace. Such precautions would be beveling the mortar bed away from the cavity or drawing a piece of wood up the cavity to collect mortar droppings. If precautions are not taken, it is suggested that a wider airspace be utilized, i.e. 1� to 2 in. Also when using glazed masonry veneer, a 2 in. minimum airspace is recommended with air vents provided at the top and bottom of the wall because of the impermeable nature of the unit. Proprietary insulated drainage boards or mats are available that provide an unobstructed drainage path that eliminate the need for a clear airspace (ref. 4).
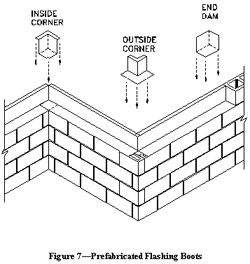
As shown in Figure 1, the flashing in a cavity wall at the intersection of the foundation should be sealed to the exterior faceshell of the structural wythe, project downward to the foundation surface, outward to the exterior face of the wall, and terminate with a sloped drip. Weep holes should be located a maximum of 32 in. (813 mm) apart. Flashing at lintels and sills (shown in Figures 2 and 3, respectively) is very similar. Although not shown, vents can be installed in the vertical head joints at the top of masonry walls to provide natural convective air flow within the cavity to facilitate drying. Prefabricated flashing boots are shown in Figure 7.
SINGLE WYTHE WALLS
Flashings in single wythe walls, like cavity walls should be positioned to direct water to the exterior. This is normally accomplished using two narrower units to make up the thickness of the wall and placing flashing between them as shown in Figure 4. Care should be exercised to insure that surfaces supporting flashings are flat or are sloping to the exterior. This can be accomplished by using solid units, lintel or closed bottom bond beam units turned upside down similar to Figure 3 or by filling cells of hollow units with gravel or grout.
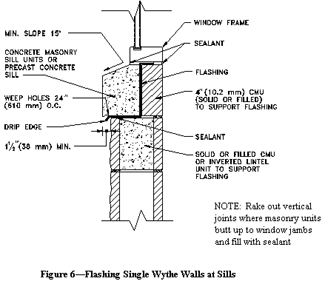
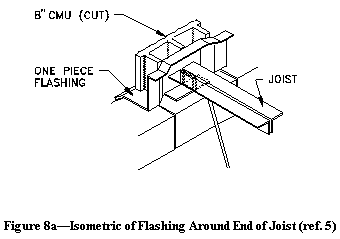
Flashing of single wythe walls at lintels, foundations, and bond beams is accomplished in the same manner as shown in Figure 4 and sills are shown in Figure 6. Through-wall flashing is used in many areas of the country as shown in Figure 5. How ever, the bond-breaking effects of this type of detail need to be evaluated in regard to the structural performance of the wall. Additional information for flashing single-wythe walls, particularly architectural concrete masonry walls, and means for providing a higher level of structural continuity at flashings is contained in TEK 19-2A (ref. 2). Flashing single wythe walls at the ends of bar joists which utilize wall pockets for bearing is shown in Figure 8 and 8a.
FLASHINGS AT COPINGS AND CAPS
The type of flashing detail to use on low-sloped roofs will in part depend on the type of roofing membrane being used. As with any flashing detail, the materials used should result in a uniform and compatible design. For example, joining two materials with significantly different coefficients of thermal expansion (such as metal flashing and bitumen roofing membrane) can cause tearing and failure of the joint. Many roofing membranes also shrink as they age and if this movement is not provided for, fracturing of the upper course of the masonry parapet can occur. Counter flashing provides the solution to these problems as shown in Figure 8. Counter flashing also facilitates the reroofing process by allowing easy removal and access to the flashing membrane fasteners.
During placement of the final courses of masonry in parapets, and commencing with the second course below the coping/cap location, a grout stop should be placed over cores so that grout can be placed for the positioning of anchor bolts (Figure 8).
In coping installations it is imperative that penetrations of through-wall flashing be tightly sealed to prevent water infiltration. A full mortar bed is required to be placed on the through-wall flashing to allow proper positioning of coping units. Full head joints are placed between the coping units as well as properly spaced control joints. The joints between the coping units should then be raked and a joint sealant applied.
Coping units should be sized such that overhangs and a drip reveal occur on both sides of the wall. Metal caps require wood plates for anchorage which are usually attached to the wall with anchor bolts. The cap should be sloped to prevent water from draining onto the exposed surface of the masonry and should extend at least 4 in. over the face of the masonry and sealed on both sides. Smooth face or uniform split face CMU should be considered for use under the cap to ensure a relatively tight fit between the masonry and cap which might be hindered by uneven CMU units such as split-face or fluted units.
INTERIOR WALL TREATMENTS
Concrete masonry walls with an interior treatment may also utilize a through-wall flashing installation of flashings as shown in Figure 9. However, as also noted in the figure, through-wall flashings generally serve as a bond-breaker which reduces the structural capacity of a masonry wall. This effect should be carefully evaluated before implementing this type of detail particularly in high-wind and seismic areas.
As shown in Figure 9, the flashing should project through the wall and be carried up on the interior concrete masonry surface. Furring strips installed to receive the plastic vapor retarder and the interior gypsum board will hold the flashing in position. This procedure permits any water that may penetrate to the interior surface of the concrete masonry wall to drain out at the base of the wall. Weep holes should project completely through the wall thickness. Vents if used should project into the core areas only.
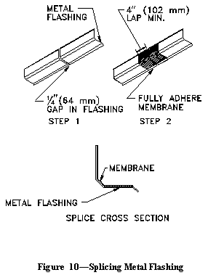
SPLICING FLASHING
When splicing of the flashing is necessary, extra precautions are required to ensure that these discreet locations do not become sources of water penetration. Flashing should be longitudinally continuous or terminated with an end dam as shown in Figure 7. The achievement of longitudinally continuous for plastic and rubber compound flashing requires that the joints be overlapped sufficiently, 4 in. (102 mm) minimum, and bonded together with adhesive if they're not self-adhering to prevent water movement through the lap area.
Lap splicing of metal flashing is not recommended as it has a different coefficient of thermal expansion than that of concrete masonry. As the temperature fluctuates, the flashing material will expand and contract differently that the masonry material which can result in sealant failure and a potential point of entry for moisture. A typical flashing splice is detailed in Figure 10. Here, the two sections of sheet metal type flashing that are to be spliced are first installed with a �-in. gap between them to allow for expansion of the flashing. Next, a section of pliable self-adhering membrane (such as rubberized-asphalt) or other pliable membrane set in mastic is fully bonded to the flashing at the location of the gap.
REFERENCES
1. Building Code Requirements for Masonry Structures, ACI 530-99/ASCE 5-99/TMS 402-99, reported by the masonry Standards Joint Committee, 1999.
2. Design for Dry Single-Wythe Concrete Masonry Walls, TEK 19-2A, National Concrete Masonry Association, 1998.
3. Flashing Strategies for Concrete Masonry Walls, TEK 19-4A, National Concrete Masonry Association, 1999.
4. Flashing...Tying the Loose Ends, Masonry Advisory Council, Chicago, IL, 1998.
5. Generic Wall Design, Masonry Institute of Michigan, 1998.